Monday, December 31, 2012

Welcome New Year 2013

A nice tick.  Vintage Elgin pocket watch, 1920s era.
(from my personal collection)
 Wishing you a very happy welcome to New Year 2013.  It's almost here !

I hope any and all who have been enjoying end year holidays have had a fab time.  I know it is cold and wintry for those of you reading from your cozy dens and lounge rooms up in the northern hemisphere.   As you know, it is summertime here.  Rather warm and no rain, which is a pity (the gardens and vineyards would all like a little rain about now).  But the days are long and brilliant, with a lot of sunshine.
grapevines in an old cottage garden
in Angaston


Along my walks this week I snapped this pic of gorgeous grapes growing in a garden of an old house in town not far from here.  The vines are very old and are a small two rows, to side of the house, right beside the fence at the foot path (sidewalk).  This garden does not irrigate or water (anything) and it is possible the house is derelict and vacant (think so, never seen anyone living there).  We saw a bloke pruning them in winter though, so we will be watching to see what happens with the grapes on the old ancient vines in coming weeks.
"We want to be Jam"
Said the bowl of red raspberries and red currants

And summer's bounty from the Barossa Market tempted me to steal some of the red fruit I bought for Christmas dessert and make jam instead !  The dessert did not get shortchanged too much, I just picked something that was not only about the fruit !  The red raspberries were amazingly bright and fragrant.  To them, and on a whim I added red currants, little jewel like berries that had a burst of tartness to them.    And on Christmas morning I whipped up a batch of jam with the fruit you see here.  This is the joy of having all the stuff to make jams now, I have all the tools and can make up a batch fast and on a moment's notice.  I keep a variety of things in the pantry at the ready.  Besides that, just need good fruit and a bit of prep and off we go.

In this case the batch was small, because raspberries are never very inexpensive and I only had half kilo to contribute to the cause (had to save some of them plus a few red currants for the Christmas cake !).

Red Christmas Jam
The batch turned out amazingly well, 3 small jars all sealed nicely.  Labels put on jars--Kim's Red Christmas Jam.  All in time to tidy up and start a dark chocolate torte, before preparing the Christmas roast.

Amazing blushing apricots,
 for more Jam

Hiding inside the fridge was a bag of the most beautiful and largest apricots I have ever seen.  Thursday I got them out and let them come to room temperature, and took in their fragrance.  I cut and de-stoned (pitted) them  and prepared a vanilla bean pod too.  These became a batch of Apricot and Vanilla Jam.  Also delicious.

stainless steel funnel,
filling jam jars
Apricot Vanilla Jam.  


I have three more batches of jam to make in coming days.  Then will pick back up on that again on my return from the January work travel out.  Something to look forward to on my return.  The kitchen here likes being a good country cook's working kitchen (who knows what jams and preserves it has supported in its history ?!).


Happy New Year !!

Meanwhile, back to enjoying the New Year's arrival.  Toasting your health, good fortune, and happiness.  May 2013 bring all you hope and wish.  Cheers !


Saturday, December 22, 2012

Happy Holiday

little humming bird figure, atop holiday flowers
 Holidays have caught me so busy this year, I have been way behind on posting to this blog, and nearly everything else.   This year we have had a series of mini holiday get togethers with (some of) our grown children and other family members here in Australia.  It was nice to declare December a Holiday Tour sort of month.

Which makes this a quiet time now to enjoy the season.  I don't even have the tree up yet (today's list).  But the cards are out (maybe a bit of a delayed dispatch).  I was at the Barossa Farmer's Market this morning, at 730AM when they opened and got a big market bag full of stunning raspberries, farm fresh eggs, locally roasted coffee, jersey cow thick cream, organically grown garlic, fresh herbs, and my favourite golden yellow Roma tomatoes.  I was out in 15 minutes and back home (for a work meeting, amazing, but true--such is working world hours from this side of the globe !)  Our cooking will be simple and fresh this coming week.

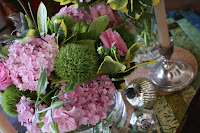
Gorgeous flowers from Viva, displayed in glass cases
with old sterling and mercury glass
The thing that really signals to me it is now Christmas is to arrange some Christmas flowers.  I've always enjoyed this, but it probably has become more important for my southern hemisphere holiday celebration, given sunny weather and not always chilly enough to do rich baking.

I collected my stunning flowers from Viva Flower Store in Angaston just before midday.  This year I did not order any particular thing, but they knew I would be calling in to pick my flowers up.  They know I can't have any lilies, because Winston is a flower grazer (and lilies are very poisonous to cats).  I looked longingly at deep scarlet coloured Amaryllis in the shop, but a quick search on google confirmed they too are toxic to pussy cats.  I just cant risk it, he is a bit naughty around flowers and its a fair bit of trouble to keep them away from him.  Thankfully, Viva's owner Avril had put aside a stunning selection for me.  Rosey hydrangeas.  Pinky lisianthus that matched and some lime green pompom ball looking flowers on long stems whose name I don't know.  I added branches of green and gold coloured holly greens to the flowers and brought it all home to arrange.  With some holiday music in the background.

The finished arrangements are stunning and I snapped photos of them to share here.  Arranged on a greeny-gold hand sewn quilted table runner.  And some old sterling candle holders of my grandmothers, with the natural beeswax taper candles I love in them.  And mercury glass ornaments for extra glow and shine.  Plus cute little hummingbird ornaments that usually go on the tree, but look so cute sitting atop the flowers !

roast turkey, settling before carve up
 Now, it feels like the holidays are here.

Last weekend we roasted a turkey when Katy visited, as part of the December Holiday tour (she flew in from Sydney).  Turned out to be the best turkey I have ever made.  A fab recipe from the latest/current issue of Australian Gourmet magazine, Turkey with Cornbread stuffing.    The Cornbread stuffing was amazingly good too.  I made very few adjustments to either it or turkey recipe, and we all thought the finished meal was really great !


Cheers Katy !
 

It was fabulous having Katy here, for a weekend visit.  We did lots of holiday things...though with out a tree up.

Katy has full attention of Winston
and Maggie
She got some feline helpers while wrapping up gifts too.  The cats love ribbons, and quickly positioned themselves close by, so they could play with ribbon streamers being put on some packages.


The bright red standard
floribunda rose in
front garden

Our roses have had a jolly hurrah, though in the past week looking a bit tired of the run of hot days we are getting each week (over 35 C)  Here is the gorgeous red standard one in front, when it was at its full bloom best.


Merry Christmas to all who celebrate it.  Hope you enjoy a happy holiday break :)

Wednesday, November 28, 2012

A New Recipe (and a Parrot Cameo)

melted 72% dark chocolate for florentines
 I have a big magazine habit.  Mostly interiors mags, but several times a year the habit expands to include food mags too.  Especially at Christmas time.  I like to try something new a bit before the holidays, to trial something to make and take to some outing or event.

This time, I found something in ABC Delicious, December 2012 edition Cranberry Macadamia Florentines.  They looked amazing in the photos in the magazine and I had most of the ingredients.  I decided to do half with white chocolate and half with dark chocolate (the recipe did them all with white chocolate).

I've never made these before, it was not that difficult, but there were a few steps and you pour the buttery-sugary base into a baking tray and then after it bakes a bit, you put dried cranberries and chopped macadamia nuts over the bubbling base and cook some more.    The base is a toffee like one, and it tastes good.

It all needs to cool a bit when it comes out, then you use a small round cookie or biscuit cutter to cut the florentines out. This part is a bit fiddly, because the base has to be cool enough not to be a molten mess, but still warm so its toffee character is not hardened too much to cut into rounds.

After they are cut out, you chill them in the fridge.  While you melt the chocolate.  I tried dipping the florentines in the chocolate but found it quite messy (a lot of chocolate also on bottom of florentine). I used a spatula to spread the melted chocolate on half the florentine instead and found this to work well for me.  After the chocolate hardens a bit, you pop the tray with these back in the fridge to let the chocolate cool and harden some more.  (best to remove them from fridge 30 minutes or so before serving).

Close up shot of the Cranberry Macadamia Florentines
on vintage pink chintz plate
The florentines passed a taste test with flying colours.  Ian liked the dark chocolate on them best.  I took a plate of these to a Bernina Club meeting later that night and they got very nice reviews.  They make an impressive looking dessert and make a special treat, good for when you want one really nice not too big thing to serve.

And below, two shots of one of the Adelaide Rosella parrots that has nested here at our house.  This may be the mother bird.  I don't have a good enough zoom lens to get a better quality photo, and she won't let me get too close when she is sitting in the tree.  She and her partner seem to take turns doing a watch duty across from the nesting box.  Ian has seen them perched on the little landing he put outside and below the hole doorway to the box.

now looking to the left, one of the Adelaide Rosellas
Nice orange colour on chest, yellow neck, banded
blue tail and wing feathers, and subtle blue
cheek coloration
The baby birds have not emerged yet, but must be getting closer to that stage.  They flap about in the box a lot and this week have begun to make little chirpy and tweet noises.


Watching the nest box, from tree opposite

close up of the nest box Ian made and tied
to our roof gable.  The parrot parents
like to perch on that landing

Saturday, November 24, 2012

Colour Mixing: Mariner

 It was very hot today, so I had to take refuge inside  and escape the heat of the day.  I had a good play with my clay and chalk paints.  I have a number of items I have been collecting that need to be painted up.  And I did some colour mixing too.  I made a lovely  soft navy blue colour out of a bright blue and a dark charcoal.  I dubbed the new blue 'Mariner.'

Having made a  decent batch of Mariner to get a good colour mix, I had enough to paint several items.  The board backing a new towel rack/hooks for the new shower area.  a small timber milking stool.  A sample board and also a shabby old finial I got for painting colour samples onto.  And a small vintage birdcage.   Most all is waxed and tomorrow will be buffed and soft polished. Except the birdcage, which will get some touch ups before sealing with wax.


I also went to a garage sale today and got some good industrial stuff:  wheels !  Here is a sampling of them.  There are enough to mount three cabinets or tables on wheels.  I cant wait to work out what they should go on !

More colour mixing next post:  from Pistachio to Margarita !

Tuesday, November 20, 2012

Parrot Season


Parrots Inside !
 I am so remiss, a lax blogger of late.  Another biz travel overseas now done and I am back and recovering from jetlag.

Here is the BIG news that happened while I was away !  Our home became a nesting place for some lovely Adelaide Rosella parrots.  To see a nice pic of what they look like, check out  this link an Adelaide Rosella photo link.

First, I must tell you, I really like these parrots.  They are gorgeous and have multi colours, with banded colour and black feathers on wings and tails.  Cute blue cheek spots.  Shy and swift, slender graceful parrots.  Sweet little bird songs and chirps.  And I read that they are fastidious, preferring tidy and clean nesting spots, not soiled or marked by other creatures, like possums.  That clinched it for me.  Parrots that are fastidious about their homes and nests, my kind of parrot !

So, what happened while I was away ?  Well, all the excitement it seems.  Apparently the parrots were already in residence here before I travelled.  In fact the cats and I heard something above the front window, over the ceiling one night before I left (we thought it might be mice--yeew !)

Anyway, when some electrical wiring work was being done, the access to the roof (from the kitchen) was open while guys were going up and down ladders into the roof.  And a parrot flew into the house from the roof !  One of the electricians told Ian a parrot was in the house.  Ian found it, at the window in the Dining Room, and he opened the door to let it outside.

But he wondered how a parrot flew from the roof cavity into the house and when the electricians left, he went to go see what was going on.  And he found a clutch of four young parrots in there.  He also found how the parents got in the roof, they chewed through some of the original timbers up in the eaves area, to gain access.  However, the access for fledgling birds to egress when ready to leave their nest did not look promising.  And with hot weather, he worried the birds would perish up in the roof one hot day.

View of the entry to the improvised parrot nest box
So what to do ?  Well, make a nesting box.  Ian fashioned one of cardboard.  He used gloves to put the small parrots inside (he said they all went off, squawking something tremendous--I miss all the fun !).  And he tied the box up at the top of the gable, right under the eaves of the roof peak.  happily one of the parents found the box within an hour, as Ian saw it go in.

Now we hear the parrot babies thumping  in the box, and sometimes I hear small bird sounds.  So long as they keep active, we are optimistic they are being fed and looked after.  They maybe half grown by now, so perhaps have another several weeks before they become fledglings.

parrots' nest box, tied under the top of the eaves of roof

We are wondering what to do next year.  Will these parrots want to come back to our roof again ?  (they often do return to a nesting place).  This winter I had wanted to put a proper timber Rosella nest box up in one of our big gum trees.  I got over-ruled by that, but maybe it is not such a bad idea.  There is time to work out a plan for this though.

Meantime, we hope the small birds get looked after (thought we do have Young parrot food to mix up and give them if we think they need it...but seems best not to interfere if they are OK).  And get to fledgling stage.  I hope to see one of them.  For now, I will be content with seeing the parents in the tree opposite the makeshift next box.


Saturday, September 22, 2012

Now It's Spring

gum blossoms in pale pink !
I have returned from business travel, and slowly recovering from more work and less rest than usual.  So blogging has not kept up, in light of this. But slowly but surely I feel more on top of things.  And, happily it is SPRING now.  It's hard not to smile or enjoy the signs of the new season unfolding in front of me.

I spent some time in the garden this past week and last weekend, planting things to give them a start before the weather gets super hot and dry like it can here.  And I am still learning things about this garden.  Like the colour of the gum nut flowers on the big tree at the top tier of the garden.  I was surprised to see they are a delicate pale pink, like little ballerina costumes hanging from the branches.  They are just beginning to open, and there are lots more buds to come, so they will be even more beautiful soon.

first roses to bloom, bella !
Up in the top tier or terrace of the of the garden are also some tough as nails (with thorns to match) roses along the fence line, that get a lot of sun and bloom earlier than the rest in the garden.  It was exciting to see the first flower just about to open, and it is a pretty pale shell hue, with a lovely perfume (and this noted before it is even fully open).

prone banksia in flower
Then in front the ground cover banksias I planted when we moved in are looking quite nice and one of them has put up two banksia flowers, russet red coloured cone shaped and like the deeply serrated leaves, quite sculptural.  And when I went to the middle upper terrace garden, I noticed that the first apple blossoms have opened, with more to come.  The bees that spend their time with the rosemary hedges (which now are covered with flowers) have found the first blossoms.  We now have one large and three small apple trees, and hopefully some good pollination partners among them.  The crabapple is supposed to help with that task too, but it hasn't bloomed quite yet, it seems a bit slower to flower.
apple blossoms on Pinkabelle (dwarf pink lady apple tree)


My neighbour's chooks are getting quite broody and letting everyone know they have eggs in the works (or in the nest).  They are a beautiful flock and seem to like the attention from the camera.

Amanda's Chooks, posing for the cam
Pookie, looking trimmer
(but still a big cat)
The cats are feeling spring in the air too.  Pookie has been wanting to run outside for a bit of a jog, perhaps taking to heart that the vet said he needs to be trimmer around his middle !  (he enjoys his kibble and his fish).  Maggie likes the beautiful middle eastern  carpet  covers for pillows I got not long ago.  These will be for the window ledges in the studio, when the enclosure is done.  But she likes them so much, she perches atop them and even let me photograph her (and usually she is shy around the camera).  The best pics I have gotten of her in a long time, maybe ever !
Maggie, serene on her new-old
carpet pillow


And last but not least, my birthday.  Growing up it was an autumn birthday  Here it is in spring.  Thanks to everyone who sent wishes.  It was a lovely day.

Another birthday, happy spring !
More soon, with more projects art, and a link to posts & pics on the Engineering & Construction Department's renovation work out back too.


Friday, August 31, 2012

Total Makeover: The Lions Cabinet


close up of detail on door and inside
of Lions Cabinet (when done)
I have nearly completed a new project !  I have begun experimenting and learning to use Chalk Paint and Clay Paints to make over furniture pieces.  Or maybe I mean little ugly duckling or plain & ordinary pieces.  And finish them off with a bit of distressing, and then sealing with wax finishes.  Not long ago I made over a sweet shabby little timber table in Annie Sloan Chalk Paint.  This was a second project, and this time I used Volvox Clay Paint.  These have very similar properties as ASCP does.  However, without the ASCP waxes, and with the paint not yet available in Australia, I have been looking for other paints with similar features and attributes.  The Volvox Clay Paint is no VOC, all natural, and very lovely, adhering and covering quite like Chalk Paint.

So below, here are a few snaps of my latest Makeover Project:  The Lions Cabinet.

Lions Cabinet:  Before State
First, I found a fabulous petite wall cabinet that had a plexi glazing (plastic) in its door and the timber finish stained in dark wood, a mahogany-like colour.   With  a great looking carved crest at the top, featuring two lions, and nice turned and raised relief patterns on the door.  (found at Bowsers of the Barossa, a terrific source of vintage items of all sorts).  The timber finish, especially inside the cabinet, was a bit rough cast and not of a fine finish, which made me think it would take well to some textured paint, a bit of distressing, and dark wax to bring out the carved relief details.  So, a piece with potential and I was sure would makeover nicely, even though I am still learning to work with these paints and also wax finishes.

First I decided to paint the inside of the cabinet a vivid blue.  I made a custom colour mix of two of the five I had on hand of the Volvox Clay paint.  I love the colour,  like the deepest cornflower blue.  A soft sapphire.

Gorgeous deep cornflower blue
Then I mixed two more of the colours, a mocha grey with good depth and a light creamy white.  These made a fabulous french grey colour.  That went on the rest of the cabinet, back, sides, top, etc.  I know this looks oh so neat, and the photos do show it that way.  I was working at Salon Rouge that day and took this cabinet painting with me, including all my supplies in and out, to be tidy !  Hence the need to be  bit tidier, in some one else's space !

Custom mixed french grey paint
for the outer cabinet surfaces.
I always intended to paint the lions and some of the detailing on the little cabinet door in a creamy white, to light the look and detail of the piece.  When I got this done, it was very exciting to see how great it was coming along.

Lions get a coat of rich
creamy white.

And to this point it was all about the paint.  Then time to put on wax.  I have used a lovely emulsified beeswax, with a soft buttery consistency.  And that smells really good.  I worked it into the painted finish.  And gently distressed a bit of the edges of it lightly with sandpaper.  A bit more clear soft beeswax.  Before putting on some Fiddes & Sons wax in Rugger Brown.


dark wax antiques finish
on side of cabinet.


The dark wax is amazing and really gives a rich look to the piece, though initially it looks a bit scary, like you are going to ruin the paintwork !  But I have read so many other blogs and accounts of using this, I was prepared for the same to happen.  Still, it takes a bit of practice to get the hang one  what is enough and what works to get it just right !  I used brush and rags to push the dark wax into the relief and edges, rubbing it back a bit with clear wax to better blend into the paintwork.  I waxed the inside of the cabinet too, which made the deep cornflower colour absolutely glow.

Lions Cabinet:  After State.
Painted and finished in clear and dark waxes.
So here is my finished painted and waxed cabinet.  It still needs glazing work to put glass in to the door.   A job to complete on my return from business travel.  But I am pretty chuffed with he job on this lovely piece excited to see it on display.  What do you think ?


close up detail of lions and cabinet door,
carved relief detail highlighted with dark wax

Saturday, August 18, 2012

Vintage Sewing Machines, and more

Singer Model 319K, made in Scotland late 1950s era.  Solid all metal gears.
Retro two tone green enamel finish.  Shown taken out of its
original timber cabinet and under restoration by Engineering Dept.


Been working on things to do at end of winter that can be done indoors.  Some of this is planning or research for a home wares and interior design services business we will launch, hopefully in autumn (for you in Northern Hemisphere, that means March to May 2013 !!).   It's all in preliminary planning stages now.  Names, registrations, Internet hosting, branding, business plans, inventory, and more !  Stay tuned for more on that as we develop it.

One of the things we decided to acquire for the business is some old sewing machines.  Not to sell, but to use for workshops in the shop.  Vintage sewing machines.  We started looking around online for old used ones for sale and now have a five, and plan to add another 1-5 to that.  Each one is carefully picked for its era, we are focusing on solid made machines with good reputations as mechanical electric sewers, mostly from the 1950s to mid 1960s era.

Maggie's Vintage Sewing Machine.  Late 1950s Husqvarna model with
amazing metallic green paint finish.  Currently being serviced.
I am still not sure I understand Maggie's interest, but her affinity for this
particular machine is very clear (she is protective of it and shoos away
the other cats if they get too close to it !)


Ian is spending evenings and weekends restoring the machines to perfect operations.  Some of this is less than simple.  Some of the machines have come to us with "issues."  Missing parts.  Retrofitted with the wrong parts, or with adjustments that have caused damage or poor function.  two take a special and hard to source needle and using the wrong ones causes problems.  We have had to research the machines and work out where to source the missing piece, and then Ian works on rebuilding it.  Sometimes he machines a missing part we can't get.  He has had to rewire two of the machines.  Thank goodness he has good skills for all of this.  In all, we have spent not a lot of money (average per machine between 35 and 80 dollars, some of these include cabinets or their old vintage cases and accessories).  And have found some gorgeous old models that now or soon will operate very nicely.  One (see photo above) fitted into a timber cabinet that I will paint to complement the two tone green finish.  They will be a great feature in our business and workshops.

ASCP colours on timber trim, from back
French Linen, Coco + Old White, and
Duck Egg over Scandanavian Pink 
Another thing I am doing is market research with specialist paints, that will be a feature and part of our business.  Here are a few samples of colours I have begun working with, from the Annie Sloan Chalk Paint (ASCP) range.  You can learn more about this very popular paint (overseas)at the  Annie Sloan Paint website.  Still not available here in Australia yet, but I brought some back with me from last travels through UK and USA.  Though, unsuccessful at getting the wax to use with it.  So I have been experimenting with Organoil's emulsified beeswax product and find its texture works well and it is a lovely wax to use, with citrus oil in it that makes it smell wonderful.  It seals off the chalk paint very nicely.

Tools !  paint and wax brushes
I am also working with a new paint, Volvox Clay Paint.  Has similar properties to the Annie Sloan Chalk Paint and is available in Australia from Colours by Nature based in Bega, NSW.  I am using the same Organoil wax with this paint, and it seals it up beautifully.  But I just got shipments of  Fiddes & Sons Supreme Wax in Light and Rugger brown  I had to buy these overseas too, and got some from UK and also another source in USA, to experiment with sourcing and shipping methods.  I will begin experimenting with this wax this week to compare its use to the Organoil wax.


Wine O'Clock.  A break from
colour swatch and sample painting
When in UK and USA in June, I  bought gorgeous Annie Sloan and other paint and wax brushes.   I got one called Waxine from Stylish Patina-wax brushes, a shop in Falls Church Virginia (outside Washington DC)  I am enjoying these tools with the sample paints I brought back.  Next travel I will be buying a few more brushes for the dark waxes.

And, we are now working on building in back of our property.  Laundry, storeroom, and a big lofty roofed studio space with outlook to the garden.   Check out latest post on our back extension renovations, on sister blog Time and Place Design  The photos are not yet glamorous to look at, but they show early stages.  And I know some readers enjoy seeing those early before and construction pics !

Sunday, August 5, 2012

Little Cyclops

Wanted to come with me, wants a clean
I still love old wheeled toys.   I still have several, some real favourites.  A vintage early 60s era blue & white Tonka farm truck.  A plush white rabbit on a wheeled platform.  I have a framed poster of a flying tricycle (sprouting feathers, as it flies up into the sky).  The child in me delights in them;  the sight of them always brings a smile.  And I continue to be drawn to old style tricycles, vintage bicycles, and red wagons.  Favorite and familiar icons and emblems to me, I guess.

So I there was no restraint to my imagination possible when I saw a red wagon outside of Bowsers of the Barossa vintage goods and consignment shop a little over a week ago (Check out their Facebook page here).  Alas, I could not stop that day, needed to be somewhere by some particular time, something like that.  But several days later I did pass that way again and called in to inquire whether it was already sold, because it wasn't outside that day.  Lucky for me, it was just inside the front door, sheltering from possible rain showers !

awesome old metal wheels,
bright yellow paintwork (albeit rusty).
Coaster lettering faintly seen (yellow).
It is a seriously cute Cyclops Coaster red wagon, with the sort of handle that apparently was clipped onto for towing by a Cyclops pedal car.  Probably vintage from late 50s or early-mid 60s era.  It has a lot of chipped paint and wear on it, but still has great old yellow metal wheels, with lots of spokes.  A blue undercarriage/chassis.  And you can still tell it used to be all red !  The side has a light outline of where the lettering Coaster used to be, and you can still see a bit of Cyclops on the side.


Cleaned and given a protective finish
of beeswax.  Too Cute !!

The wagon came with me.  I was covering hours at Salon Rouge gallery right after I picked it up.  It was my afternoon project.  I cleaned the dust and surface dirt off it and then carefully rubbed in a light as can be coat of beeswax to protect the finish and the patina.  Too cute !  Don't ask what I will do with this just yet, but I have wanted a vintage red wagon for awhile !!